KubeSphere Walkthrough: Everything you Need to Know

Have you just started working with Kubernetes or you are already working with Kubernetes and you need a tool that will simplify your experience as a developer?
You are at the right place! We will learn about an awesome tool that will help you in your Kubernetes journey and that tool is KubeSphere.
Now you may ask...
What is KubeSphere
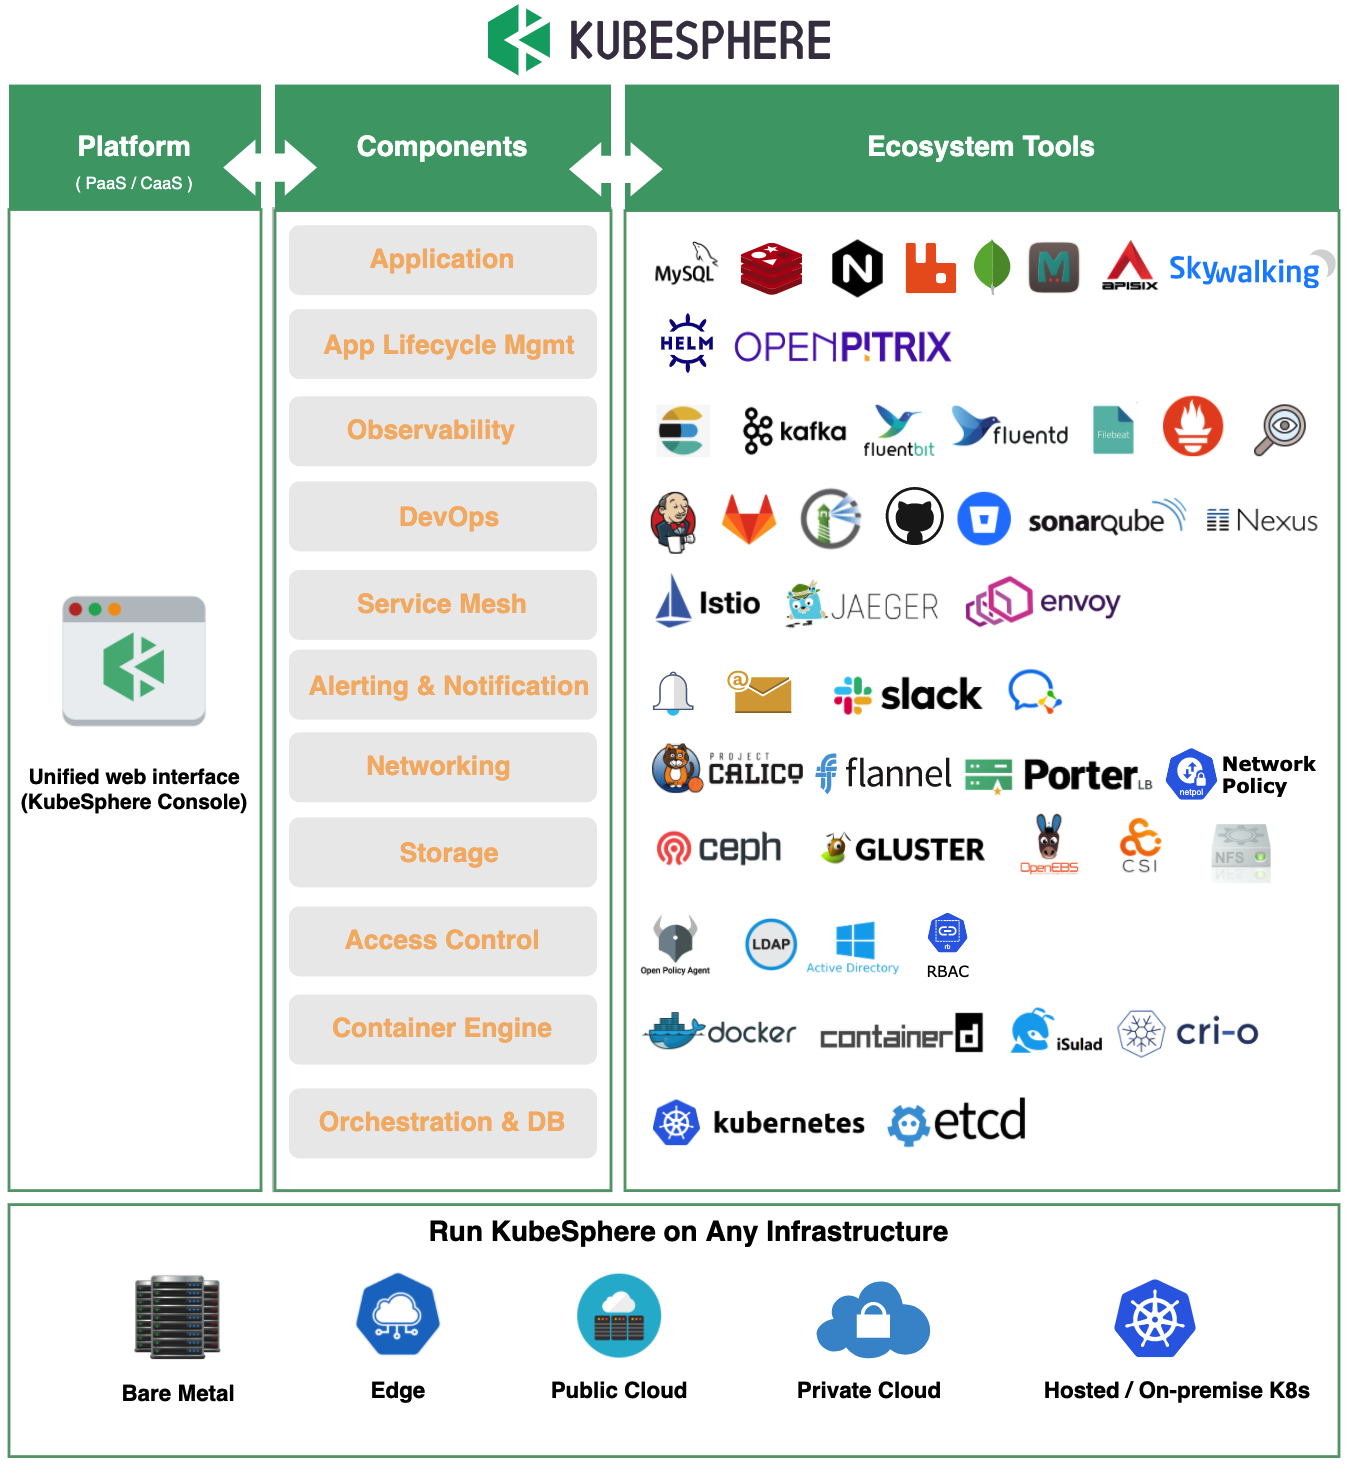
KubeSphere is a distributed operating system for cloud-native application management, using Kubernetes as its kernel. It provides a plug-and-play architecture, allowing third-party applications to be seamlessly integrated into its ecosystem. It provides developer-friendly web interfaces and streamlined DevOps workflow.
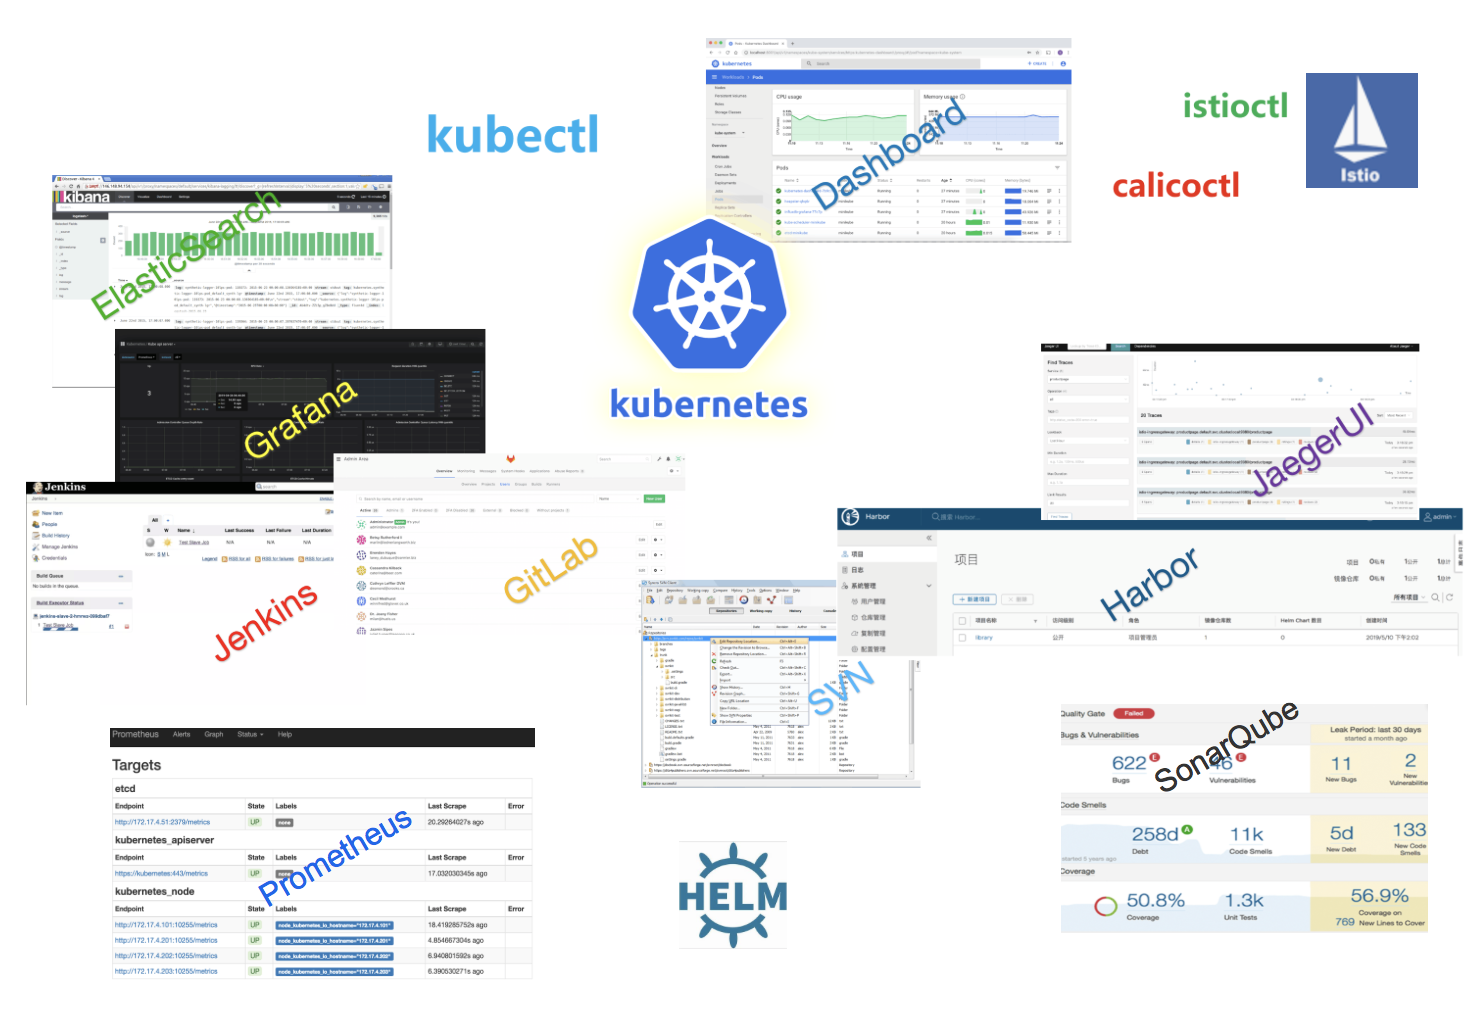
Speaking plainly, in daily operation, maintenance and development, developers might need to utilize and manage a ton of open source tools, while frequently switching between the GUI and CLI of different tools. And that's when KubeSphere comes to the rescue.
DevOps workflow & how KubeSphere helps you
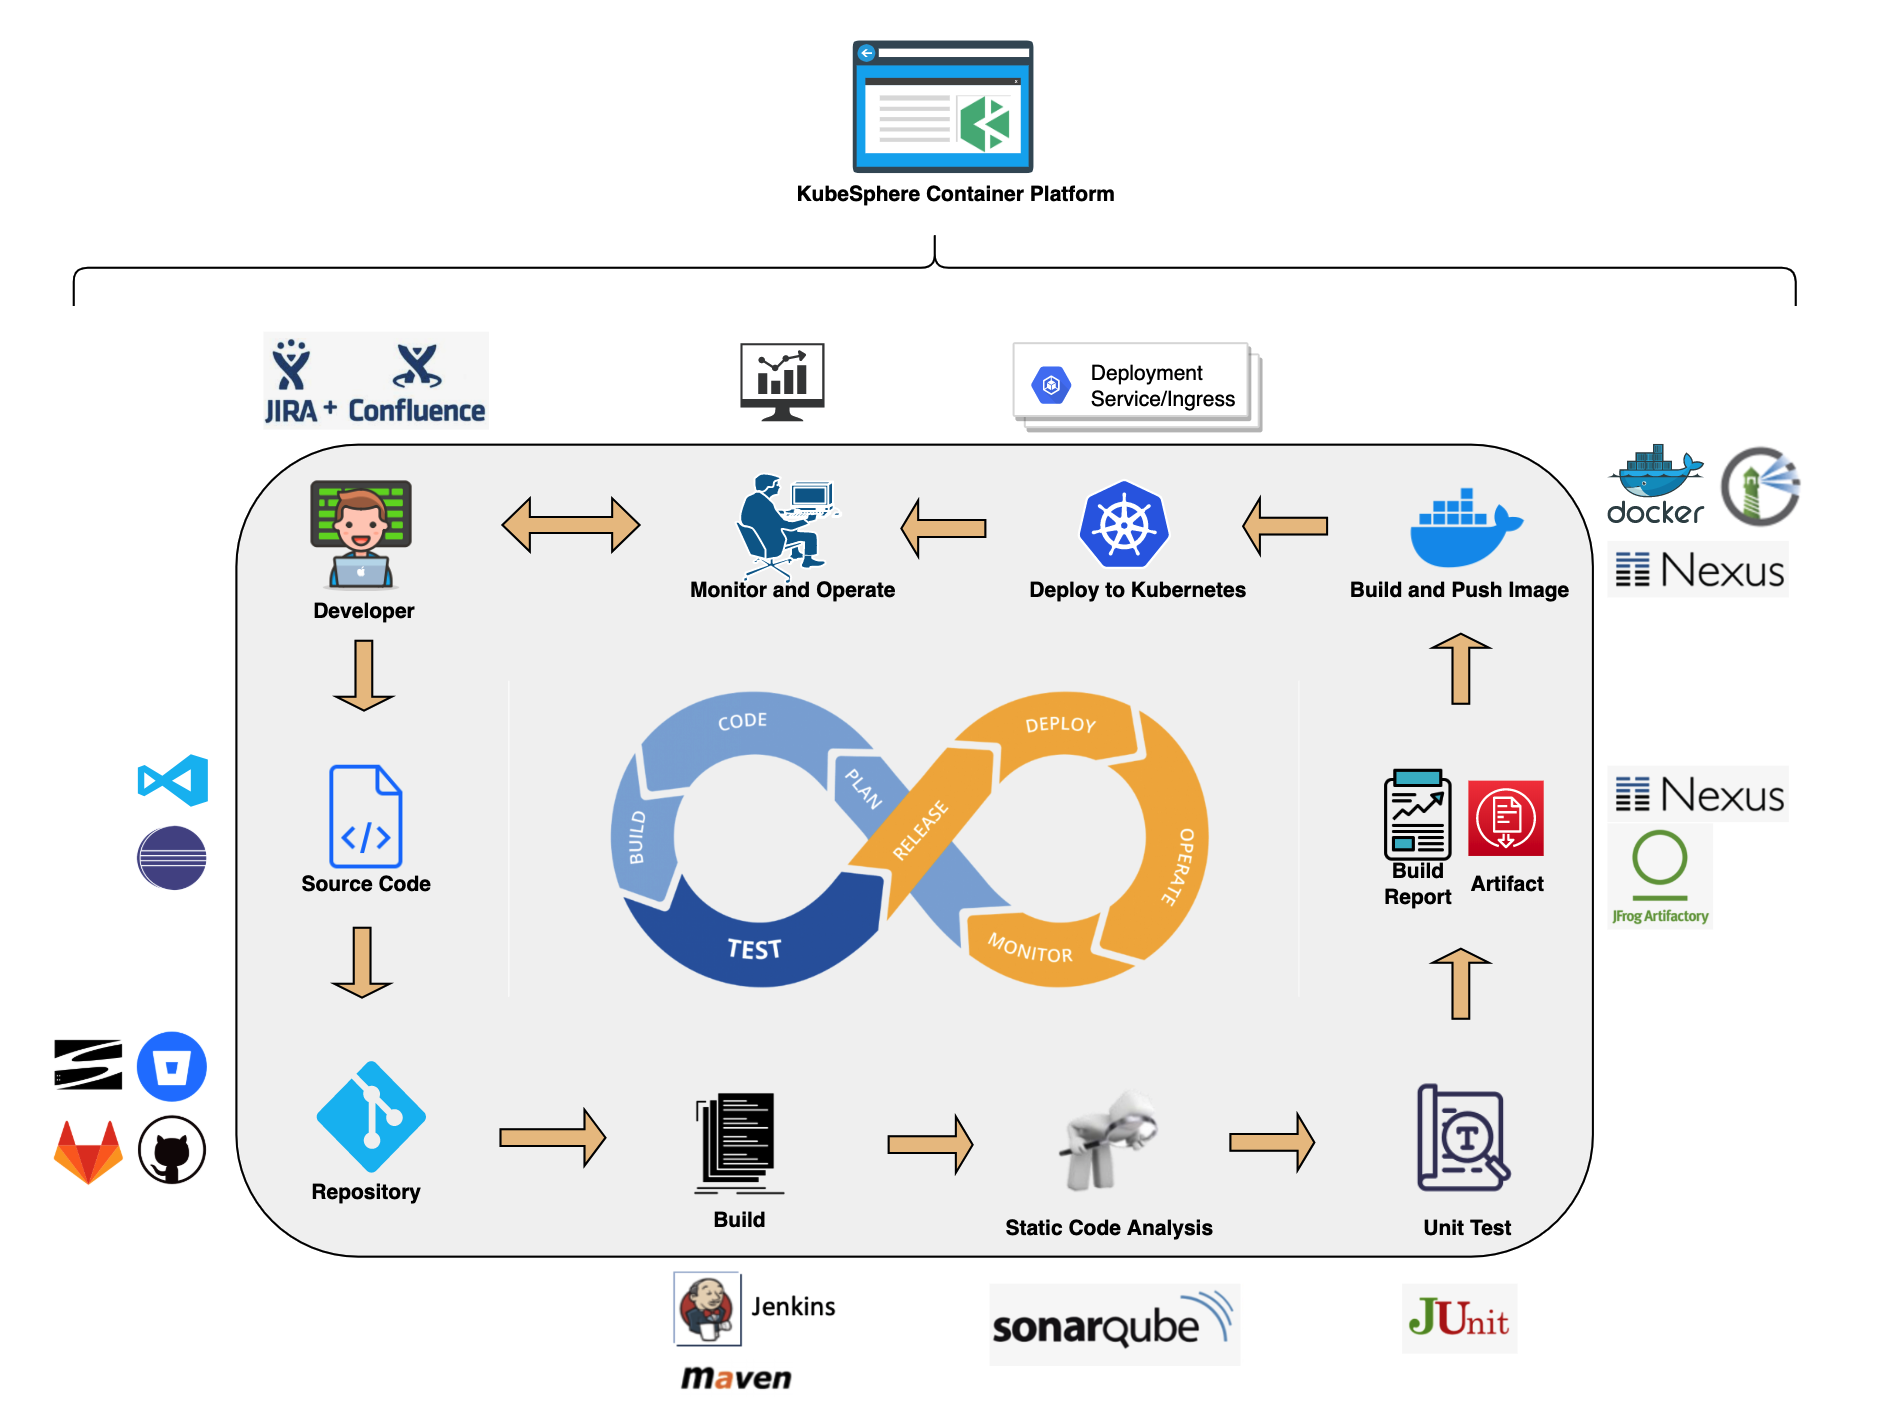
This is what a typical DevOps workflow looks like:
- Continuous integration: The practice of automating the integration of code changes from multiple contributors into a single software project.
Tools used: Jenkins - Continuous testing: The process of executing automated tests each time code changes are made.
Tools used: Selenium - Continuous delivery: The ability to get changes of all types, including new features, configuration changes, bug fixes and experiments into production, or into the hands of users, safely and quickly.
Tools used: ArgoCD - Continuous deployment: A strategy for software releases wherein any code commit that passes the automated testing phase is automatically released into the production environment.
Tools used: GitLab - Continuous Monitoring: An automated process to provide organizations with almost immediate feedback and insight into performance and interactions across servers, networks, and cloud environments, which is pivotal in enhancing operational, security, and business performance.
Tools used: Prometheus and Grafana

Given their broad scope, working with cloud-native tools separately to manage each of these tasks could be quite painful and overwhelming.
KubeSphere offers a coordinated solution to manage all these tools, creating a consistent user experience. That means the production efficiency of development and maintenance within an organization can be greatly improved as we are freed from separately handling and managing control panels and command line terminals of various open source tools.
And with an easy-to-use web console, KubeSphere offers a gentler learning curve for new developers and drives the adoption of Kubernetes.
Get started with KubeSphere
If you are new to KubeSphere and want to test it locally and get familiar with the platform, All-in-One installation is the preferred choice. For Development and Production grade setup check the Installation Docs
Prerequisites
To get started with installation, you need a Unix based machine. Else you can also create a Linux VM instance on cloud providers such as GCP.
For most Linux Distributions the minimum system requirements are 2 CPU cores, 4 GB memory, and 40 GB disk space.
A container runtime must be already installed, I am using Docker.
Note: The following system requirements and instructions are for the default minimal installation without any pluggable components enabled. If you want to enable more components, it is recommended to have more CPU cores, storage and memory.
For more information refer to the Official documentation
All-in-One Installation
All-in-one installation installs both Kubernetes and KubeKey together, so if you have already Kubernetes installed, refer to the below installation tutorial.
Before moving forward with this installation, make sure the DNS address is available in /etc/resolve.conf. Watch this Video to setup your DNS address if you haven't already.
For this installation you need to also install a dependency, I'll be installing conntrack on ubuntu/debian.
Let's get started:
First, we'll install the required dependencies.
$ sudo apt update
$ sudo apt install conntrack
$ sudo apt install socat
Next, we'll install KubeKey:
$ curl -sfL https://get-kk.kubesphere.io | VERSION=v1.1.1 sh -
Note: The commands above download the latest release (v1.1.1) of KubeKey. You can change the version number in the command to download a specific version.
Making kk executable:
$ chmod +x kk
To create a Kubernetes cluster with KubeSphere installed, you only need to run one command:
$ ./kk create cluster --with-kubernetes v1.20.4 --with-kubesphere v3.1.1
After you run the command, you will see a table for environment check. Type yes to continue.
Note: Kubernetes v120.4 is the recommended version for KubeSphere v3.1.1
Run the following command to verify the installation:
kubectl logs -n kubesphere-system $(kubectl get pod -n kubesphere-system -l app=ks-install -o jsonpath='{.items[0].metadata.name}') -f
The output should look something like this:
#####################################################
###              Welcome to KubeSphere!           ###
#####################################################

Console: http://192.168.0.2:30880
Account: admin
Password: P@88w0rd

NOTES:
  1. After you log into the console, please check the
     monitoring status of service components in
     "Cluster Management". If any service is not
     ready, please wait patiently until all components
     are up and running.
  2. Please change the default password after login.

#####################################################
https://kubesphere.io             20xx-xx-xx xx:xx:xx
#####################################################
Click on http://192.168.0.2:30880 to login into the web console.
Install KubeSphere on an existing cluster
Installing KubeSphere on an already existing cluster is quite easy. Let us first start a cluster, in case you haven't already:
$ minikube start --memory 4g --cpus 2
Note: You can use any other tool such as kind, microk8s to start your k8s cluster. In my case, I am using minikube.
Once you have started your K8s cluster, let's install KubeSphere.
You have to simply run these two commands:
$ kubectl apply -f https://github.com/kubesphere/ks-installer/releases/download/v3.1.1/kubesphere-installer.yaml
$ kubectl apply -f https://github.com/kubesphere/ks-installer/releases/download/v3.1.1/cluster-configuration.yaml
To verify installation, run this command:
$ kubectl logs -n kubesphere-system $(kubectl get pod -n kubesphere-system -l app=ks-install -o jsonpath='{.items[0].metadata.name}') -f
In the output, you can see the console port which is http://192.168.0.2:30880 to access the Web console.
And there you have successfully installed KubeSphere. 🎉
KubeSphere Architecture Overview
KubeSphere allows developers and DevOps teams to use their favourite tools in a unified web console, but, most importantly, these functionalities are loosely coupled with the platform since they are pluggable and optional, meaning, the tools are executed only when required and remain independent from the platform.
KubeSphere uses a loosely-coupled architecture that separates the frontend from the backend. Cloud Native tools can access the components of the backend through the REST APIs. In addition to that, KubeSphere can run anywhere from an on-premise data centre to any cloud to edge. It can also be deployed on any Kubernetes distribution such as Rancher, EKS, etc. Please see API documentation for more details.
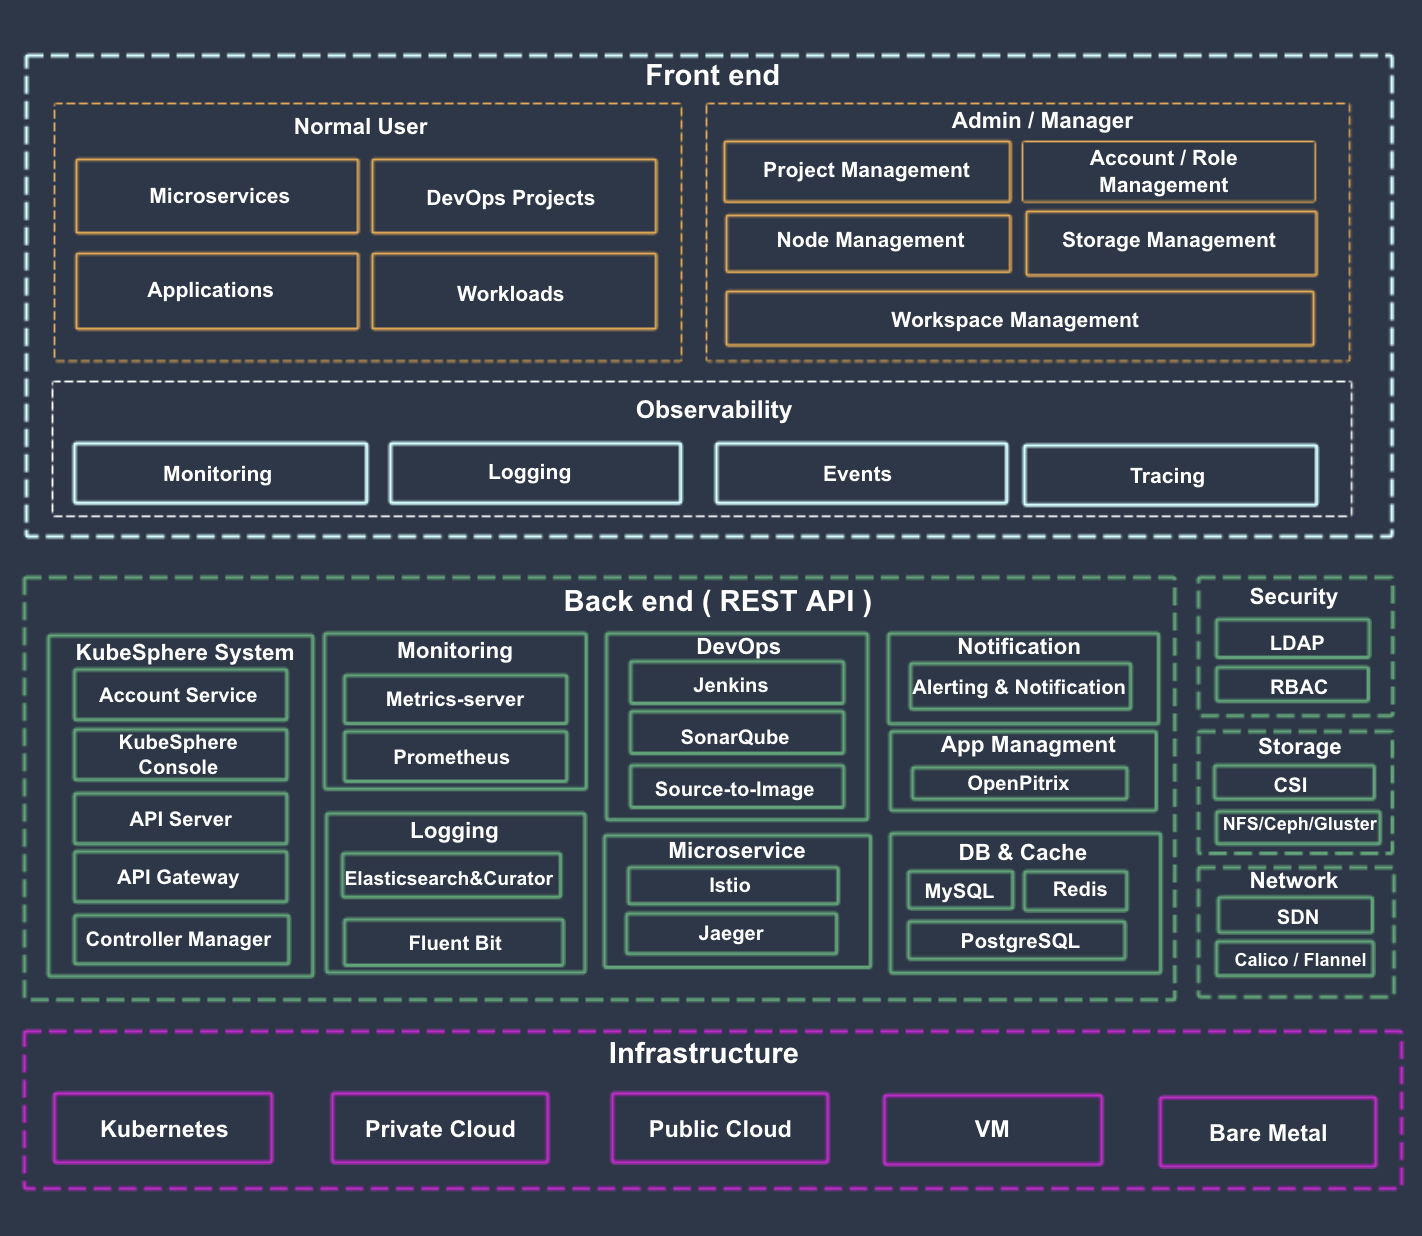
Refer to the Architecture Docs to learn more about the services and components of the architecture.
Key features offered by KubeSphere
KubeSphere offers lots of features needed for organizations to adopt Kubernetes. Some of which are Service Mesh (Istio-based), CI/CD, security management, SourceCode-to-DockerImage, log query and collection, alerting and notification, auditing, application management, etc.

The following sections describe the most common features, for detailed information refer to Features Documentation
Deploying and maintaining K8s
KubeKey allows developers to deploy Kubernetes on the infrastructure out of the box with high availability.
KubeSphere also provides a graphical web console, giving users a clear view of a variety of running Kubernetes resources, including Pods and containers, clusters and nodes, workloads, secrets and ConfigMaps, services and Ingress, jobs and CronJobs, and applications.
With KubeSphere, developers can manage the infrastructure underneath, such as adding or deleting clusters, monitoring, log collection, etc.
DevOps Assistance
KubeSphere provides Rest APIs to connect various DevOps and CI/CD tools such as Jenkins, GitLab, Prometheus, etc to the backend.
It also features automated workflow and tools to build reproducible container images from source code and binary packages.
- KubeSphere provides a unified user interface to use and manage service mesh tools such as Istio, Envoy and Jaeger. KubeSphere can help you reduce the learning curve since you do not need to deep dive into those tools individually.
Observability and Monitoring
KubeSphere offers a Customized monitoring dashboard where developers can decide exactly what metrics need to be monitored in what kind of form.
With third-party compatibility developers can deploy monitoring tools such as Prometheus in the KubeSphere web console and seamlessly monitor the visualized data and metrics.
Application Management
KubeSphere provides an app store for app management across the whole lifecycle, including release, removal, and distribution.
KubeSphere also provides App templates for a visualized way for app deployment.
Inference
Now that you have learned the functionalities of KubeSphere, it's time for you to refer to this blog and set up KubeSphere for yourself.
Kubernetes has become the de facto standard for deploying containerized applications at scale in private, public and hybrid cloud environments. However, many can easily get confused when they start to use Kubernetes as it is complicated and has many additional components to manage.
Hehe not anymore, you've got KubeSphere to eliminate many Kubernetes headaches related to building, deployment, management, observability and so on :D
Go ahead, give it a try and share your experience :)
Know more about KubeSphere here:
KubeSphere Official Website
Learn about KubeSphere in depth:
KubeSphere official documentation
Connect with the team and contribute to KubeSphere here:
KubeSphere Contribution


