Here's how you set up Dev Environment for Open Source Projects in seconds!
Using Gitpod you can fire up fresh new automated Dev Environments in the cloud in seconds.


Let's first talk about how you usually set up the development environment of an Open Source Project. Initially, you install the required language, dependencies, and additional tools such as Docker & local K8s cluster, configure them and then deal with errors while setting this up, etc. Repeat the same mess again for another project. Too tiring, time-consuming, complex and inefficient, isn't it? There's a super simple solution to this problem - GITPOD!
What is Gitpod?
My favourite software! Okay, technically speaking; Gitpod leverages the cloud and container technology to build a completely remote, production-ready development environment in seconds in your BROWSER! Yes, you don't need an expensive laptop to contribute to Open Source or build your own projects for that matter. In this blog, we are going to mainly explore how you can set up an Open Source repository, build it locally and contribute to it from your browser.

How to set up Gitpod?
Firstly Sign Up in Gitpod and choose a pricing plan, if you just want to try it out, the free tier would be a good starting point. Next, there are 3 primary ways to set up the dev environment in Gitpod. As follows:
Make sure you first fork the repo, you'd like to contribute, I have created this Github Repo that you can fork and contribute using Gitpod. Go ahead, share your Twitter ID in the readme file.
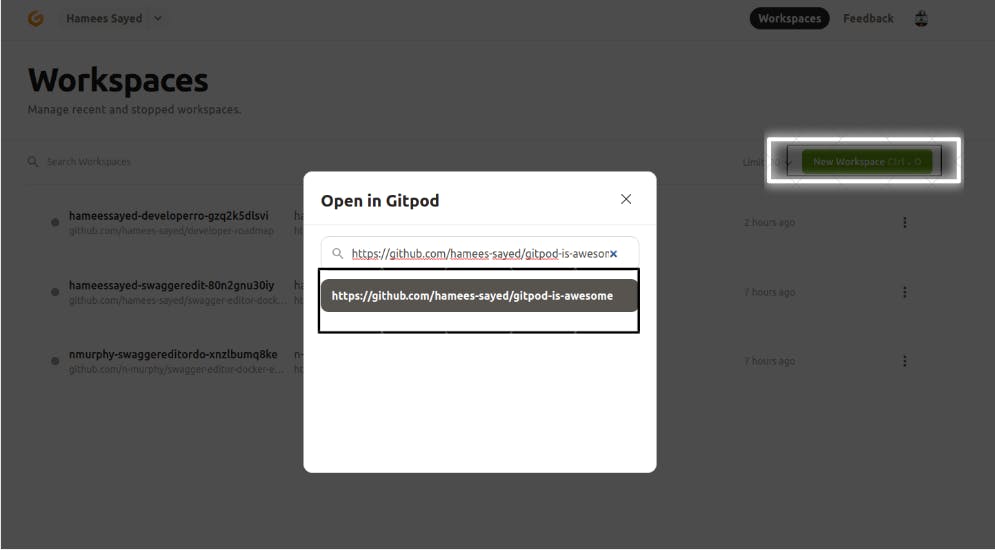
1. Add the workspace in Gitpod Dashboard
Once you have forked the repo, go to your Gitpod Dashboard, press ctrl + o on your keyboard or click on New Workspace and type the link of the forked repo, for example: https://github.com/{your-username}/gitpod-is-awesome. DONE! Gitpod will set up the environment in a few seconds and automatically install all the dependencies required. You can now add your Twitter ID to the repo, basically, at this stage, you make the code changes and raise a PR.
Follow this article to learn how to create a PR on Github.
OR
2. Install the Gitpod extension
Install the Gitpod chrome extension from here, navigate to the forked repo on GitHub and click on Gitpod.
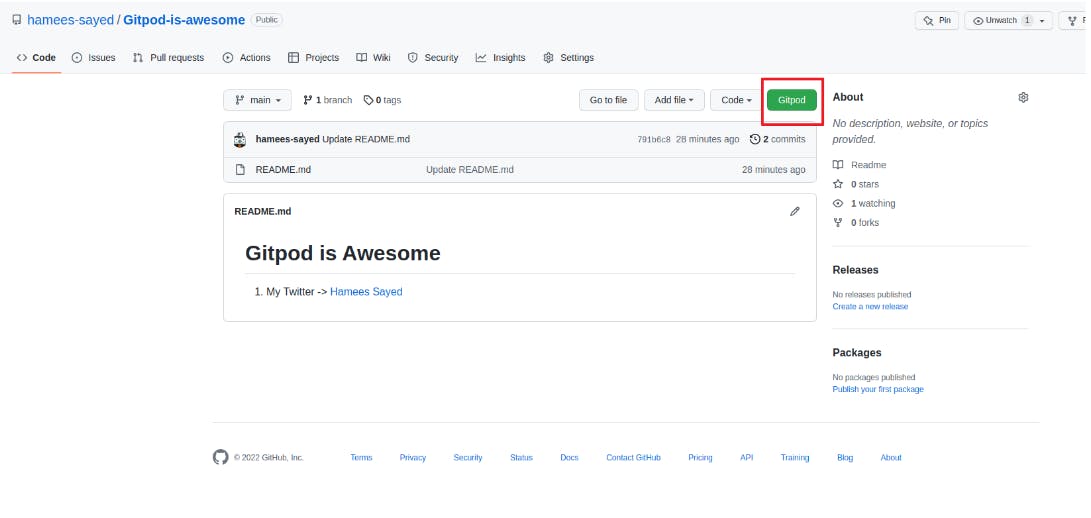
You can now start developing the application instantly.
OR
3. Modify the URL
To start a new workspace, prefix gitpod.io/# to the GitHub repo, for example: https://gitpod.io/#github.com/{your-username}/gitpod-is-awesome

What is .gitpod.yml?
.gitpod.yml is like an instruction script that tells Gitpod how to prepare and build the project. It sits in the root directory of the project and you can edit it according to your use case.
In case you don't want to commit .gitpod.yml to the main repo, consider unstaging it from the working tree by doing git restore --staged .gitpod.yml and then push the changes for a PR.
Summary
It's as easy as that, I have summarised everything you need to know in order to start using Gitpod. Hope this blog encourages you, even more, to contribute to Open Source now. You no more have to waste your time setting up every repo individually, Gitpod offers a more efficient and user-friendly alternative :)